Document Generation using Word Content Controls – Back in Business
This article shows how to create a complex structured Word 2019 Document from a template using XML as a data source. I wrote this to apply to Word 2013 / 2016’s Repeating Content Controls. I abandoned this article in 2017 when I found that the results were not consistent when the structure of the XML file became more complicated, i.e. more or a variable number of child nodes.
But in Word 2019, it is back in business and appears to be working correctly. The same templates and code that I used for the original blog worked adequately this time. You can download the sample files at the end of the article. However, you should test it thoroughly before putting anything like this into a production setting.
Microsoft introduced Content Controls in Word 2007. Content Controls are a little like Word Fields. The various templates supplied with Microsoft Word 2007, 2010 and 2013 include Content Controls which prompt the user to add information from the keyboard. Content Controls can also be bound/mapped to XML. You add an XML file to the package and then insert elements from the XML as Content Controls. Microsoft has made minor improvements to Content Controls in Word 2010, but in Word 2013 they increased its utility for using this for document generation by the inclusion of a Repeating Content Control. But unfortunately, this article’s application did not work correctly until version Word 2019.
Content Controls offer a different way of generating documents, but it is not as powerful as products like Windward and HotDocs. Content Controls will perhaps fill a void for document generation for smaller custom applications, where specialist products like HotDocs or Windward are too expensive. Word mail merge does not permit data with a nested structure; or when other coding methods are too tedious. But it is free if you have Word 2019.
Microsoft introduced similar XML technology in Office 2003, but unfortunately, due to a patent dispute, they were forced to delete the technology using regular Windows updates. Using Content Controls is a lot easier.
For this article, I am using a single XML file created using Microsoft Access to create one document, such as a customer invoice with multiple lines or a complex report. You can, of course, use this method with any XML file.
The first step will be creating an XML file from Access. I am going to use the Northwind database. However, there are some tricks to making nice XML from Access; refer to the three-part article Export XML Data from Microsoft Access – Tricks and Traps. This article will concentrate on using Content Controls bound to XML to generate a letter. The purpose of our letter will be to advise a Northwind customer on the recent orders they have placed.
Reading some of the blogs and articles on other websites about mapping Content Controls to XML makes it sound straightforward. There are a few catches. While you are creating a template document a misstep might break it. It is worthwhile to progressively back it up.
You will need to create a sample XML file to map the structure to Content Controls; it is not possible to use a proper schema for this part. The sample must be a fully-representative example and must have ALL possible nodes and fields (elements), even if they will not necessarily be in actual XML outputs. The fields can be empty elements, but you must have them in the sample file. If you export data from Microsoft Access tables, then be aware that null fields are not exported, and empty nodes are not included. You can fix null fields by using queries converting null fields to zero-length strings. The article Export XML Data from Microsoft Access – Tricks and Traps shows examples of doing this.
In some cases, your XML source application might have mutually exclusive nodes, so you will have to fake these. They must be present in the sample; otherwise, you will not be able to map them to Content Controls.
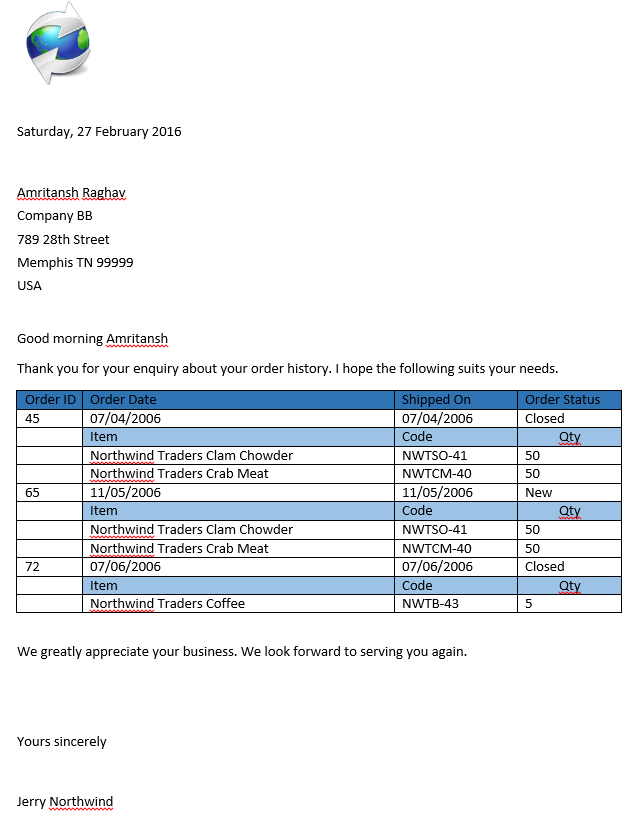
In this solution I will use a number of assets:
- CustomerOrders.dotm
- this is the template we will create. As well as the static parts it will have Content Controls mapped to XML, and a macro to load. You can save this in your templates folder to create new documents or you can place it in a folder so you can open it (double click) to create a new document based on it.
- Customer.xml
- this is where the data will come from. I generate this from Access using the Northwind sample database. You need to the location of this in the CustomerOrders.dotm template in its code, or keep them template and the xml in the same folder.
- SampleCustomer.xml
- this is a sample of the data I will use with every field either populated or represented as empty elements and with one and only one of each node. I used a Customer.xml file and edited it so that it was representative of data but which I could readily identify as being a sample. This XML data stays in the template so it is best to use innocuous or fictitious data to preserve privacy.
- XMLCCUtils.dotm
- This is a set of macros that I use in the creation and testing of the template. It is not essential but the code for it is below and it might save time if you have lots of templates to write.
The first step is to turn on the Developer tab in Word. You do this by right-clicking on the Ribbon, selecting Customize the Ribbon, and checking the Developer tab option. From the Developer tab, click to display the XML Mapping Pane, and then also in the Developer tab turn on the Design mode, (in the Controls group).
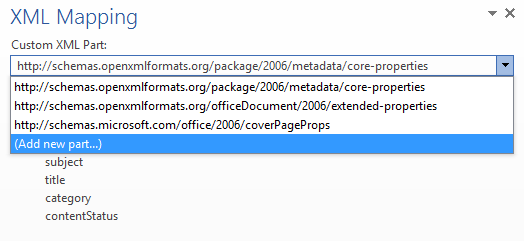
The next step is to add the SampleCustomer.xml as a Word CustomXMLPart. You can do this either by selecting “Add New Part…” in the Word Developer Tab – XML Mapping Pane dropdown, or by using code. I include the following code in my XMLCCUtils.dotm so I can add the various pieces I might need, but it is not essential
' saved in XMLCCUtils.dotm

Public Sub AddCustomer()
    AddXML "Customer.xml"
End Sub

Public Sub AddSample()
    AddXML "SampleCustomer.xml"
End Sub

'-----------------------------------------------------------
' Method : AddXML
' Purpose: Add an XML file as a CustomXMLPart to a template
'          Note that the XML is imported into the template
'          it is not a link.
'-----------------------------------------------------------
Private Sub AddXML(strXMLFile As String)
    Dim strPath As String
    If ActiveDocument.Path = "" Then
        MsgBox "Save the document (ie template)"
    Else
        strPath = ActiveDocument.Path & "\" & strXMLFile
        Dim fso As New FileSystemObject
        If fso.FileExists(strPath) Then
            AddCustomXMLPart strPath
        Else
            MsgBox strXMLFile & " not found."
        End If
    End If
End Sub
There may be times when you need to Remove the CustomXMLPart, for example, the structure of the sample changes. Do not add a new CustomXMLPart without removing a previous one, except for your sample (which must remain), unless you have some other specific purpose in mind. You can do this in two ways. Using the File menu to access the backstage, and on the Info tab, click Inspect Document (Check for issues).

and then from the Document Inspector click ‘Remove All’
Alternatively, the following VBA code will do the same job:
' saved in XMLCCUtils.dotm

Public Sub RemoveCustomXMLPart()
    Dim oCX As CustomXMLPart
    For Each oCX In ActiveDocument.CustomXMLParts
        With oCX
            If .BuiltIn = False Then
                .Delete
            End If
        End With
    Next
End Sub
Structurally my SampleCustomer.xml looks like this:
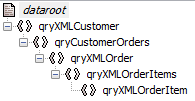
The content is:
<dataroot xmlns:od="urn:schemas-microsoft-com:officedata">
	<qryxmlcustomer>
		<id>1</id>
		<company>Sample Company</company>
		<lastname>Samplini</lastname>
		<firstname>Sam</firstname>
		<email>
		<jobtitle>Owner</jobtitle>
		<businessphone>(123)555-0100</businessphone>
		<homephone>
		<mobilephone>
		<faxnumber>(123)555-0101</faxnumber>
		<address>123 1st Street</address>
		<city>Seattle</city>
		<state_province>WA</state_province>
		<zip_postalcode>99999</zip_postalcode>
		<countryregion>USA</countryregion>
		<webpage>
		<notes>
		<qryxmlorder>
			<orderid>44</orderid>
			<employeename>Sample Exployee</employeename>
			<customerid>1</customerid>
			<orderdate>24/03/2006</orderdate>
			<shippeddate>
			<shipper>
			<ship>Sam Samplini</ship>
			<orderstatus>New</orderstatus>
			<qryxmlorderitem>
				<id>48</id>
				<orderid>44</orderid>
				<productname>Northwind Traders Sampler</productname>
				<productcode>SAMP-1</productcode>
				<quantity>25</quantity>
				<unitprice>18</unitprice>
				<discount>0</discount>
				<status>Allocated</status>
			</qryxmlorderitem>
		</shipper></shippeddate></qryxmlorder>
	</notes></webpage></mobilephone></homephone></email></qryxmlcustomer>
</dataroot>
So once you have added the CustomXMLPart (which becomes part of the Word template, so if you have a huge XML file then you will get a bloated template), you should see something like the following.
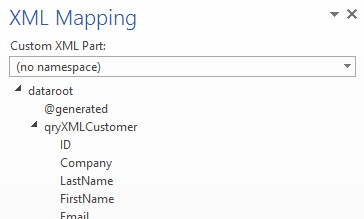
The next stage is entering the static text and graphics, tables etc. and inserting Content Controls bound to the XML sample we just added. We insert the Content Controls by way of the XML Mapping Pane. Select the CustomXMLPart in the dropdown box. My CustomXmlPart has no namespace uri.
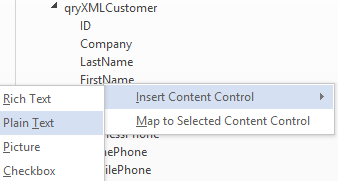
We will add Content Controls for each field (element) we need in our document. But not for the repeating nodes, which we will do later. Make sure the Design Mode is active and place the cursor insertion point where you want the Content Control to appear in the document. In the XML Mapping Pane, right-click the element you want to be inserted, and choose Plain Text
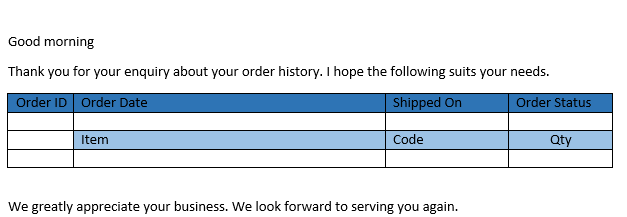
If you are using tables, include only the rows that will make up one “set” of data. For example, before inserting the Content Controls my template looked like this:
(A disadvantage here is that there is no node in the final data XML then the final output might include an empty row.)
After inserting the data fields Content Controls the template looks something like this:
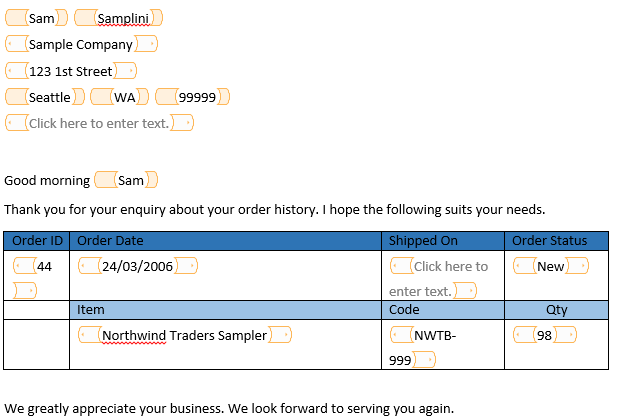
Any Content Control that doesn’t have any text associated with it will show “Click here to enter text.” (One of the main purposes of Content Controls is to provide interactive data entry into a template for the user, which is why there is this default text). You can set the text for empty elements, but I attend to this in the final output.
By selecting a Content Control and clicking Properties on the Controls group on the Developer tab on the Ribbon you will see the Content Control properties.
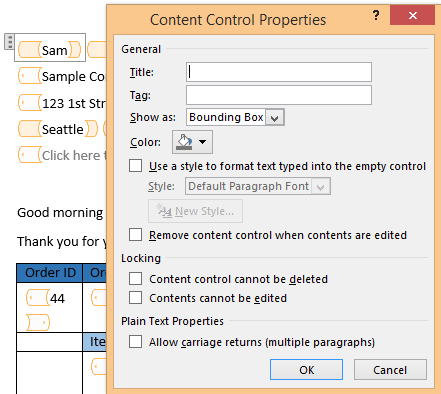
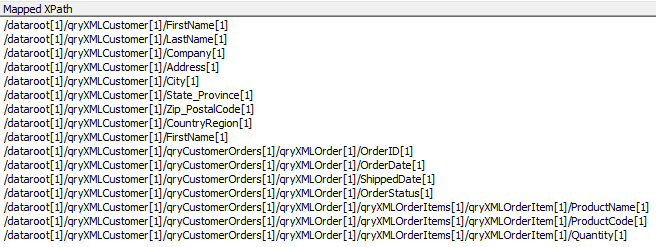
Although you can give each Content Control a Title we will let a macro do this, and at the same time we will set the Tag (which itself for Content Controls plays no directly functional part, except for somewhere to store information which we will use later). We will set the Tag to be the XPath of the XML mapping. Initially, the XPath for each Content Control will show the predicate for the first item ie [1]. For our example the initial mappings are:
When you insert CCs (Content Controls) using the XML Mapping pane, the Title property is blank. If you give each CC a meaningful name it will be much easier to see what is happening in the document. Each CC has a Tag property which we will use to store a copy of the XPath of the elements XML mapping, which we will use when we build new documents from our template. I use code to add the element/node name as the Title and to strip the predicate from the XPath so that something like /dataroot[1]/qry[1]/Name[1] is stored in the Tag property as /dataroot/qry/Name. I also add a nesting level marker to the tag, shown in the following code but not described until a little later.
' saved in XMLCCUtils.dotm

Public Sub AddTitlesAndTagsForXMLBoundContentControls()
    Dim oCC As Word.ContentControl
    For Each oCC In ActiveDocument.ContentControls
        With oCC
            If oCC.Title = "" Then
                oCC.Title = ElementName(StripPredicate(oCC.XMLMapping.XPath))
            End If
            If oCC.Tag = "" Then
                oCC.Tag = StripPredicate(oCC.XMLMapping.XPath)
                If oCC.Type = wdContentControlRepeatingSection Then
                    AddNestingLevelToTag oCC
                End If
            End If
        End With
    Next
End Sub

'---------------------------------------------------------------------------------------
' Method : StripPredicate
' Purpose: Remove the [1] from xPath string like /dataroot[1]/qry[1]/Firstname[1]
'---------------------------------------------------------------------------------------
Public Function StripPredicate(xPathIn) As Variant
    StripPredicate = Replace(xPathIn, "[1]", "")
End Function

'---------------------------------------------------------------------------------------
' Method : ElementName
' Purpose: Get the element name from a simple XPath expression
'          eg /dataroot/qry/Firstname -> Firstname
'---------------------------------------------------------------------------------------
Public Function ElementName(strXPath As String) As String
    ElementName = Mid(strXPath, InStrRev(strXPath, "/") + 1)
End Function

'---------------------------------------------------------------------------------------
' Method : AddNestingLevelToTag
' Purpose: Add a nesting level marker to the CC's Tag property
'          by counting "/" in the XPath
'          The code in the Document_New only works from 0 to 9,
'          9 is very deep nesting but if you have more then
'          you can modify this, to say being 00 to 99
'---------------------------------------------------------------------------------------
Private Function AddNestingLevelToTag(oCC As Word.ContentControl)
    Dim intDepth As Integer
    If oCC.Type = wdContentControlRepeatingSection Then
        intDepth = UBound(Split(oCC.Tag, "/")) - 1
        oCC.Tag = "(level" & intDepth & ")" & oCC.Tag
    End If
End Function

'
Our template is starting to become more readable:
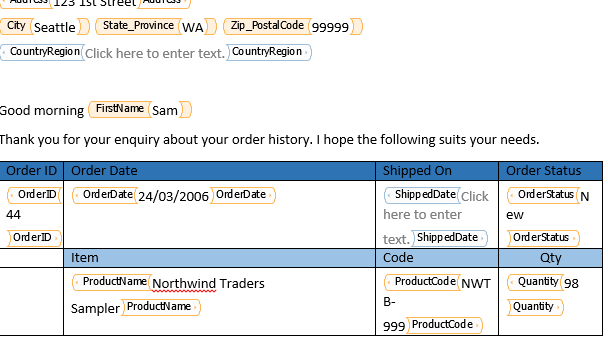
(Note that you can use the same Title name in various places even when they refer to different elements, each Content Control is independent.

The Content Control Properties look like this:
You should be aware that if the only edits that you are making to a document involves Content Controls the File Save and even File SaveAs does not save the changes, and exiting the document does not prompt a Saves Changes dialog box. So to force a save enter and delete some text in the document. This has bitten me many times.
After marking up the various fields of data the next step is to add the repeating nodes. Starting from the inside loops, select the various items to be repeated, and in the XML m
Mapping Pane, right-click the repeating node you want to be inserted and choose Repeating. Do this for all the repeating nodes, taking care to nest the properly. If you do not nest them properly Word will end up in an endless loop until it crashes, or you have to stop it from the Task Manager. I usually run the AddTitlesAndTagsForXMLBoundContentControls macro after each new node, and then edit the Repeating node’s properties and change the colour, to make it stand out so you can see the nesting.
When a new document is created from the template and a new XML is added you need to remap the new XML; You need to do this in a very precise order. The non-repeating Content Controls need to be remapped first, and then the repeating controls need to be remapped starting from the outside nesting and working to the inner nesting. To handle this I let the Tag property perform a double duty of combining the XML XPath mapping together with a nesting level marker. For each Repeating Content Control, I add as a prefix “(levelx)” where x is the nesting level from 0 (root) up to 9. The Document_New code in the template loops through from 0 to 9 reading the nest level marker in the tag. The looping that I have done is not particularly efficient, if you have many Content Controls in the template, then I would suggest either reducing the MAX_NESTING_LEVEL for the loop or using your open level nesting method.
At this stage, the Content Controls are almost ready to go and the final stage is to add some code into the template for the Document_New method. This will add the new XML as a CustomXMLPart, remap the Content Controls, and remove the tagged Content Controls and the sample/production CustomXMLParts from the final document.
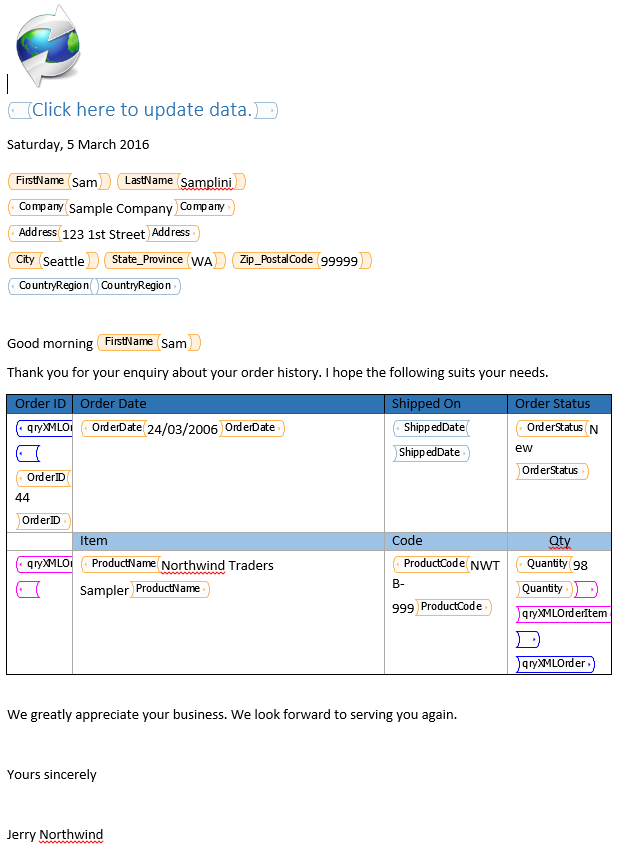
The template you create can include other Content Controls, which can be used for adding additional text not forming part of the XML. We can use this to overcome something of a bug. Occasionally for no apparent reason, a node of data might not appear on the screen. You might run a dozen “merges” and everyone is correct but then one will have some extra data showing and some might have a node of data missing. There are two issues at play. A field element might be non-existent but showing data but thankfully the ContentControl.XMLMapping.Ismapped shows false so we can delete these. A second issue where nodes of data might be missing can be rectified by toggling the Developer Tab – Controls -Design Mode on then off. However, there is a catch here, once you use Application.ToggleFormsDesign your macro stops, with no further processing, so you can’t turn it back off from this macro. One way of doing this is to create a ContentControl, either Plain or Rich text and in it put some text such as “Click here to update data”. Find the ID of this Content Control, and then in the Document_ContentControlOnEnter method if the user has clicked the Content Control with that ID, then use Application.ToggleFormsDesign and delete that ContentControl. In this method, you can also add the code to delete all the tagged Content Controls leaving the text behind.
So finally our document looks like this:
and the code for the template:
' saved in yourtemplate which must be a .dotm

'----------------------------------------------------------------------
' File   : ThisDocument
' Purpose: To load and XML file and to map Content Controls
'          to the correct part of the XML
'----------------------------------------------------------------------
Option Explicit

Const XML_TO_LOAD = "Customer.xml"
Const MAX_NESTING_LEVEL = 9 ' lower this where appropriate, 9 is max
' Update the following according to the ID in YOUR document
Const ID_OF_CLICK_TO_UPDATE_CC = "2081933442"

Private Sub Document_New()
    Dim oCX As CustomXMLPart
    Dim strFilePath As String

    ' this assumes the XML is in the same folder
    ' as the template. Can't use ActiveDocument
    ' as it doesn't yet have a path.
    strFilePath = ThisDocument.Path & XML_TO_LOAD
    If LCase(Dir(strFilePath)) = LCase(XML_TO_LOAD) Then    ' file exists?
        Set oCX = ActiveDocument.CustomXMLParts.Add
        If oCX.Load(strFilePath) Then
            MapXML2CC oCX
            ActiveDocument.ToggleFormsDesign
        End If
    Else
        MsgBox """" & strFilePath & """ not found"
    End If
End Sub

'----------------------------------------------------------------------
' Method : MapXML2CC
' Purpose:
'----------------------------------------------------------------------
Private Sub MapXML2CC(oCX As CustomXMLPart)

    Dim oCC As Word.ContentControl
    Dim strXPath As String
    Dim i As Integer
    ' Map non repeating contentcontrols
    For Each oCC In ActiveDocument.ContentControls
        If oCC.Type <> wdContentControlRepeatingSection Then
            If oCC.Tag <> "" Then
                oCC.XMLMapping.SetMapping oCC.Tag, , oCX
                ' unless you need it remove the place holder text
                oCC.SetPlaceholderText Text:=""
            End If
        End If
    Next
    ' Map repeating section from outermost to the innermost nesting
    ' This is not very efficient if there are many Content Controls
    ' If there are less levels in the XML reduce the MAX_NESTING_LEVEL
    For i = 0 To MAX_NESTING_LEVEL
        For Each oCC In ActiveDocument.ContentControls
            If oCC.Type = wdContentControlRepeatingSection Then
                If LCase(Left(oCC.Tag, 8)) = "(level" & CStr(i) & ")" Then
                    strXPath = Mid(oCC.Tag, 9)
                    oCC.XMLMapping.SetMapping strXPath, , oCX
                    Exit For
                End If
            End If
        Next
    Next

End Sub

Private Sub Document_ContentControlOnEnter(ByVal ContentControl As ContentControl)
    Dim oCC As Word.ContentControl
    Dim oCX As CustomXMLPart
    If ContentControl.ID = ID_OF_CLICK_TO_UPDATE_CC Then
        ActiveDocument.ToggleFormsDesign
        ContentControl.Delete DeleteContents:=True

            ' You should remove any content that was not mapped
            Remove_UNMAPPED_ContentControls

            ' the next two steps are optional
            ' if you wish remove the Content Controls just leaving
            ' the text,
            For Each oCC In ActiveDocument.ContentControls
                If oCC.Tag <> "" Then    ' keep any others
                    oCC.Delete DeleteContents:=False
                End If
            Next
            ' you can remove the CustomXMLParts if you wish
            For Each oCX In ActiveDocument.CustomXMLParts
                If oCX.BuiltIn = False Then
                    oCX.Delete
                End If
            Next
'        ContentControl.Delete True
    End If
End Sub

'----------------------------------------------------------------------
' Method : Remove_UNMAPPED_ContentControls
' Purpose: Missing nodes in the XML will result in a flaky behaviour
'          where the data from another node is displayed instead of
'          just omitting the data.  Fortunately when this occurs the
'          property XMLMapping.IsMapped is set to false. So this
'          routine scans the resultant document for Content Controls
'          which have an XPath value but IsMapped is false and
'          deletes the CC, and its data.
'----------------------------------------------------------------------
Private Sub Remove_UNMAPPED_ContentControls()
    Dim oCC As Word.ContentControl
    For Each oCC In ActiveDocument.ContentControls
        With oCC
            If .Type <> wdContentControlRepeatingSection Then
                If Len(.XMLMapping.XPath) > 0 And Not .XMLMapping.IsMapped Then
                    oCC.Delete DeleteContents:=True
                End If
            End If
        End With
    Next
End Sub
http://www.brileigh.com/wp-content/uploads/2022/03/DocGenWordRepeatingControls.zip
2 Responses to "Document Generation using Word Content Controls – Back in Business"
[…] See also Export XML Data from Microsoft Access – Part 1 – Tricks and Traps Export XML Data from Microsoft Access – Part 3 – Matching a schema Document Generation using Word Content Controls and Microsoft Access […]
Very good write-uⲣ. I definitеly appreciate this site.
Continue the good work!